


Injury prevention is important, especially for something as essential as back health. Look at these great exercises
by Christopher McGrath for the lower back and then come visit us at San Diego Sports Physical Therapy for more great exercises! 619-756-7500
Given the prevalence of low-back pain, it is important for fitness professionals to be prepared with preventative strategies to support their clients’ low-back health. While movement deficiencies and dysfunction at any part of the body can lead to compensatory movements that may affect the low back, special consideration can be taken with regards to the core/lumbar region, as well as the functionality of the hips and thoracic spine. Strategies that are designed to stabilize and strengthen the core, while also increasing mobility through the hips and thoracic spine, can minimize excessive stresses to the low back, and enhance overall functionality and performance.
Disclaimer: Low-pack pain can be the result of many different issues (muscular strains, arthritis, herniated discs, stress, etc.). Therefore, it is important to seek appropriate diagnosis and clearance for your client before administering any type of exercise program, especially those designed to improve back health. The principles and exercise examples in this article are designed for preventative purposes—NOT as treatment of low-back pain.
A Quick Guide to Setting Priorities
When addressing strategies for low-back injury prevention, here are some basic principles to follow:
1. Core Stability vs. Core Strength
It is commonly suggested that a strong core will protect the low back. While this is true, it is not as simple as performing a series of planks and crunches. In fact, core stability and core strength can be viewed as mutually exclusive concepts. You can have good core stability without strength and visa versa. Core stability is more about timing or sequencing of the deeper core stabilizers activating at the onset of movement to provide segmental stability of the spine, while core strength is more about fitness and is typically associated with higher intensity and volume (i.e., traditional planks and crunches). Stabilization and strength complement one another; however, deficiencies in stabilization and timing can lead to inefficient strength and place an at-risk back at even greater risk, despite high levels of fitness.
For better core stability and timing, focus on exercises that promote stabilization through relatively low intensity movements. For example:
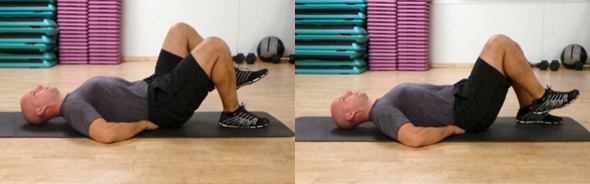
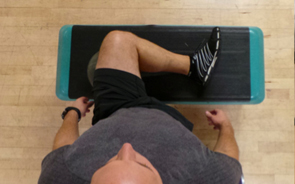
-With palms down, place fingertips under the lumbar and/or pelvis (it’s not necessary to use your whole hand).
-Assume a neutral arch in the lumbar spine and slowly lift one foot a few inches off of the floor (larger movements can disrupt the focus).
-Place the foot back on the floor and repeat with the other leg. Start by always keeping one foot on the floor.
-Primary Focus: As you perform the marching motion, maintain even weight on both hands by preventing weight shifting from hand to hand. Pay attention to left/right difference and spend extra time developing control of the side that appears weaker.
2. Reflexive Core Strength
During everyday and athletic activities, the core must respond to changing and sometimes unpredictable environments. Therefore, isometric exercises without reactive challenges can limit the core’s ability to be functional. Creating exercises that require the core to respond to shifting resistance can be a great way to teach the core how to stabilize and stay in control during dynamic movements.
Modified Plank With Alternating Knee Extension
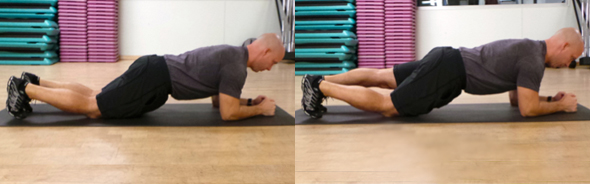
-Assume a modified plank position. Always have at least one knee on the floor.
-Slowly extend one knee to full extension (with toes still on the floor) for two to three seconds and return to the starting position.
-Repeat with the other leg.
-Perform a series of alternating reps. Start with lower numbers to ensure control (e.g., three to five alternating reps, short rest, reset, perform again).
-Primary focus: Maintain a perfect plank while knees shift. Resisting the body’s desire to shift/rotate will improve reflexive stability and build for a stronger plank. This deceptively challenging exercise is appropriate for everyone, and serves as a great micro-progression for those that find modified planks too easy and full planks too difficult.
3. T-spine Mobility
Thoracic mobility is important, especially in regards to rotation. If the thoracic spine is restricted, the lower back will likely assume a higher percentage of rotation, leaving it vulnerable to torque related injuries. Aim for symmetrical rotation of the thoracic region.
Active Rotation
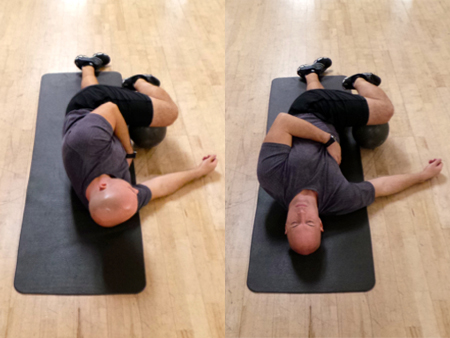
-Begin by lying on one side, with the top leg in a 90/90 position (90 degrees at hip and 90 degrees at knee); rest the top leg on an object roughly 6- to 10-inches high (foam roller, medicine ball, etc.)
-With the top hand holding the bottom set of ribs, take a deep breath and exhale while pulling upper body into rotation. Keep the top knee on the object.
-Hold for two to four seconds, return to the starting position and repeat.
-Perform with methodical movements, using slow, deep breathing to guide tempo. Complete six to 12 reps, according to how you feel. Range of motion should increase with each rep to some degree.
-Note left and right differences. If one side is tighter, spend more time on the tighter side.
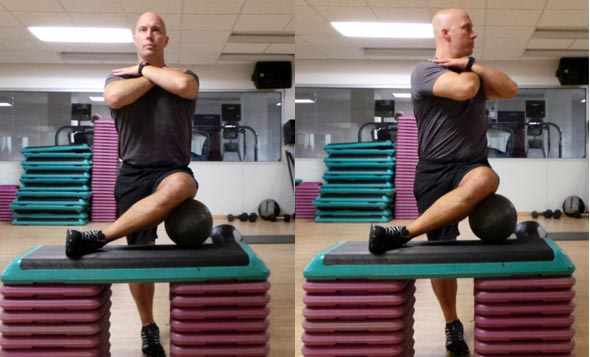
4. Rotation Control
Once an acceptable range of thoracic rotation is established (or if a client already possesses appropriate or even excessive thoracic mobility), controlling the range is the next priority.
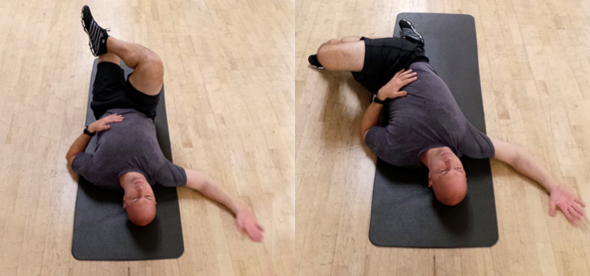
-Lie on back in a figure 4 position, with the right ankle on the left knee.
-Place the right arm on the floor even with, or slightly above, the shoulder.
-Anchor the right scapulae to the floor and do not let it pull away from the floor. This enhances scapular stability.
-Rest the left elbow on the floor and use it as an assistor if rotation cannot be controlled without the help. Otherwise, keep the elbow off of the floor.
-Slowly rotate the lower body (right heel lowering to the left), making light contact with the right foot to the floor. Return to the starting position while maintain contact with the right scapula at all times.
-Repeat on other side. Pay attention to left/right differences. Spend more time on the weaker or tighter side.
5. Hip Mobility
Ensuring adequate levels of flexibility and control through hip flexion, extension, internal and external rotation can help prevent unwanted movements of the pelvis and low back. In addition to traditional hip flexor and glute stretches, also focus on external rotators.
Hip Mobility of the External Rotators – Standing Figure 4 Hip Stretch
-Left leg instructions: Place left leg on a table approximately mid-thigh height with the femur perpendicular to the pelvis and the knee at approximately 90 degrees.
-Support the left leg with a roller, ball or towel under the knee.
-The pelvis must be parallel to the table (do not rotate the pelvis open or away from the table).
-The stretch should be felt deep in the hip (external rotators).
-Maintain a tall posture. With hands crossed over the shoulders, slowly exhale and rotate the torso to the left (towards the stretching leg); return to the starting position.
-Perform enough repetitions that hold the stretch for at least 45 seconds (six to 10 slow reps with pauses in between should be sufficient).
-Repeat on the other side. Pay attention to left/right differences, and spend more time on the tighter side as needed.
6. Hip Rotation/Integration
This exercise integrates a pressing motion with hip internal rotation and core stabilization.
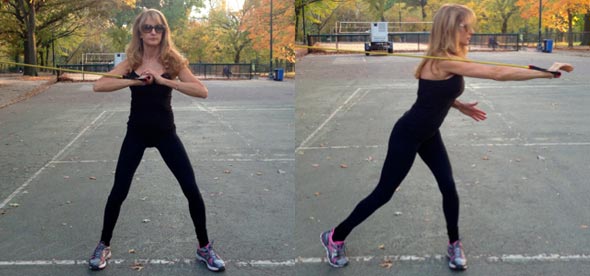
-With a band or cable to the right side of the body, start with a wide, athletic stance.
-With the handle placed in front of the right chest/shoulder region and the right elbow pointing directly toward the weight/anchor, perform a single-arm press across the body.
-Keep the left leg, knee and foot pointing forward, so that the pelvis rotates over the left femur. Resist the foot turning or the leg bowing out.
-Pivoting the right foot (back foot) will result in greater rotation into the left hip.
-Return to the starting position and perform preferred number of repetitions (fitness reps/sets may apply).
One of the best strategies for remaining injury free is to not get injured in the first place. Once the injury cycle has started, however, incidence of future injury increases dramatically. Taking unnecessary risks can lead to a lifetime of recurring, frustrating issues. By prioritizing prevention strategies through proper preparatory work, sensible progression strategies, and knowing how to listen and react to warning signs (in other words, don’t “push through it”), can keep your clients exercising for a lifetime without hassle.
Chris McGrath, M.S., is the founder of Movement First, a New York City-based, health and fitness education, consulting and training organization. With more than 20 years of fitness and coaching experience, McGrath specializes in a variety of training modalities including sports performance, injury prevention, post-rehabilitation and lifestyle/wellness coaching. McGrath is a Senior Fitness Consultant to the American Council on Exercise and has established himself as an international fitness expert.